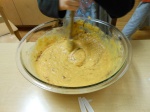
Deliciously Squashy

Gearing up for the autumn holiday season, the kids and I have been branching out from our apple bonanza and diving into squashes and starches (at least the ones with some nutritional value that is)! With so many varieties out there, there’s a lot you can do. To get the kids sucked into my delicious, squashy (both as in the food, and the texture), creations, we started with Pumpkin Butter. Fitting, right? Since they had already begun looking at this particularly popular squash in their morning classrooms, it seemed like a good entryway into the later autumn harvest foods.

So far I have yet to find a recipe my kids don’t like. Better yet, I have yet to find a recipe their parents don’t like! When trying our creation in the classroom, I spread it on crackers for the kids, but really it’s good on everything and anything—I brought some to my family’s house and we ate it on amazing gluten free chai waffles my master chef of a sister made. It was one of the better decisions I’ve made in my life.

[I also must say I’m really happy I got photos of this all happening because it was so much fun to do with the kids!]

Pumpkin Butter:

Ingredients:                                                                 What you need:

1 Med-Lg. Pumpkin (any kind will do)                             Baking sheet

1 Tbs. cinnamon                                                            Measuring cups and spoons

1 tsp. allspice                                                                 Wooden spoon

1 ¼ C. sugar                                                                  Large cooking pot

¾ C. maple syrup                                                           Potato Masher
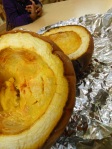
Start cleaning the pumpkin by cutting it in half and scooping out all the seeds. Once cleaned, place them on a baking sheet and roast them at about 400 degrees until the meat of the pumpkin is soft and tender. You may see pools of water forming—that’s normal. Pumpkins are pretty water squashes, which will come in handy when you get to the mashing and cooking part of this recipe.

[At this point, we stopped cooking for the day because of time, but keep going! It’s worth the work!]

After the pumpkin has had time to cool, begin peeling the skin off, or simply scooping out chunks of the meat into the large pot. Start mashing the pumpkin with the potato masher. Right about now is when you’ll notice just how much water is held in a pumpkin. There’s quite a bit, but that’s good because it allows us to make the butter without any added water! Continue mashing until smooth (or however chunky you like. If it’s a bit chunky it makes for a great chutney consistency).

[This part is particularly fun for the kids. It definitely allowed us the chance to “hulk-out” on something and get that energy out!]

Begin adding the spices, maple syrup, and sugar. Stir the mixture well to get an even distribution.

Finally, place the pot on the stove and cook that mix down! It will reduce to about ½ its size, so no worries, you won’t have a fridge full… although you may want that.

This next recipe was also a big hit. The kids not only loved it but I’m creating a rendition of this pudding to use as a pie filling in a gluten and dairy free sweet potato pie for my family’s Thanksgiving (both my sister and I are GF and Dairy free, so Thanksgiving can be a bit tricky).

Sweet Potato Pudding:

Ingredients:                                                                             What you need:

3 Med. Yams or sweet potatoes                                                Baking sheet

1 can of coconut milk (full fat, not the Lite)                                 Potato masher

½ Cup maple syrup                                                                   Large bowl

1 tsp. cinnamon                                                                        Wooden spoon

½ tsp. allspice                                                                           Measuring spoons

Start by baking the potatoes in the oven at 375 degrees. You want them to be soft, so they mash very well. Once cooked, cut them in half to cool before you and your helper handle them [don’t want anyone getting burned].
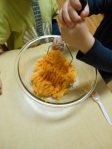
Scoop the meat of the potato into the bowl, and begin mashing it up with the potato masher. The more you mash, the smoother it will be.

[You could say we’re branching out from the zip lock bag method and exploring the use of different types of kitchen tools. I was actually surprised when one of my kids knew exactly what the potato masher was]

Add the coconut milk slowly. This part could get messy and you don’t want a coconut milk sweet potato paste on your floor.

Mix in the rest of the spices and stir well. My kids pretty much attacked the bowl at this point and ate it all. I guess you could call that a success!

Both of these recipes prove as great additions to any Thanksgiving meal. Honestly, although I served the Pumpkin Butter on a cracker for the kids to try, I had several walking out the door with a cup and spoon eating it straight up. The Sweet Potato Pudding was also an amazing discovery for me. My inspiration for it came from a collaborative meal created with my fellow blogger Julian Karma Grow from Ancients of the New Age. Where I strive to become a health resource for children, Julian and his business partner Mike do a great job holding down the fort as health resources for adults. Check out their blog Ancients of the New Age, trust me, you’ll be inspired.

Better Late Than Never

Better late than never. I’m still working out regaining my normal schedule after the whole Hurricane Sandy mess—so my apologies for not being on top of this blog.

It’s been an interesting journey. Over the past couple weeks I’ve began to receive emails from the parents of my preschoolers thanking me for the work I’ve been doing, and the food based curriculum I’ve created. These emails have come at a critical time, because prior to two weeks ago, my curriculum was being challenged by a few, and I was questioning if I was creating the results I wanted to see.

If anything, a few things have been reminded to me. Throughout this process I am not only teaching the kids about food, cooking, and basic nutrition, I’m teaching their parents as well. As I stated a few posts back, this isn’t to say that parents or adults don’t know how to feed themselves or their children, because they, in the literal sense, do. It’s more to say that there isn’t enough time dedicated to teaching ourselves, or other [kids] about food, and exposing those around us to various types of food and cooking styles.

Another interesting thing to note is the dialogue within my classroom the past few weeks. As well as starting to be able to pair tastes and smells together and create recipes on their own, the kids are also beginning to ask me more involved questions about the food they eat, and have a more informed understanding to the answers I’ve given them. For example, yesterday one of my kids asked me if she could have another Graham Cracker for snack (our snacks are provided by the parents as part of the co-op model of the preschool). My response was, “well, you’ve already had quite a few Graham Crackers for snack…” to which she immediately jumped in stating, “and if I eat more they can make me sick, because they’re not that healthy for me.” After stating this fact, she simply got up, cleaned her snack spot, and went to play. It was a unique interaction because this was the first time this child has had an understanding of the idea that too much of something could harm the body.

Ultimately, the learning process is always a slower one and that pace will not change (even if you have parents watching your every move and questioning what you’re doing). It’s definitely a practice in patience, not only for myself, but the parents and the school’s administration as well. But things are shifting, and key concepts are beginning to root in the minds of the kids. It’s going to be an exciting winter.

Graham Cracker Mixed Apple

In the beginning of October, the preschool I’m working at went on an apple picking field trip. As I had mentioned before, the school was overflowing with apples. It was a little overwhelming. But like any person striving for mindful balance in their life, I checked myself on that feeling, and continued on with energy that doesn’t collapse in the face of challenge.

This was the true beginning of the “Apple Saga,” for me. I walked into work that afternoon to two refrigerators, several bags, a few bowls, and two bins filled with apples. It was a sight to behold. Even though it wasn’t one of our normal cooking days, I had a very small class, and a truck load of inspiration from those apples. After pulling some leftovers from snack, the spices we have been using, and several apples, I sat down with one of my kids who is always the first to help out in the cooking process. Being a bit curious to the 3 year old mind, I let her take the reigns for a bit to see where she went with the ingredients, and together, this is what we came up with. This would be my first recorded collaborative recipe with a 3 year old, and I think she did a great job of naming it. Oh how I wish I had my camera that day.

[To be honest, the ingredients in the crackers were not, by any means, my favorite (or always pronounceable). On top of that, I try not to do many things with pre-made ingredients with my children. Since I didn’t have time or ingredients to make homemade graham crackers, and the parents of the Co-op are responsible for bringing in snack weekly, and these were left over, I was OK with the kids using them… this once!]

Graham Cracker Mixed Apples

Ingredients:                                    What you need:

5 apples                                              Large mixing bowl

½ cup maple syrup                            Wooden spoon

¼ cup olive oil                                 Cutting board/knife

2 Tbs. cinnamon                                   Baking pan

1 tsp. nutmeg                                  Measuring cups/spoons

1 tsp. allspice                                      Large zip-lock bag

12 graham crackers

Bake: 375 degrees

Start by peeling and cutting the apples into chunks- they don’t have to be too small, think more like cutting regular apple slices in half. To speed up the process, while you’re cutting up the apples, if you have a smaller friend who can’t use knives yet but would like to help, I find placing the graham crackers in a zip-lock bag, sealing it [this is important], and then asking them to crush up the crackers is a wonderful way to keep them occupied. Once the apples are cut, and the crackers are mashed, place them all in the bowl, and begin to add the other ingredients. My 3 year old helper liked to put the olive oil and maple syrup in first, stir the apples a bit, and then put in the spices. But really, it’s all going to the same place so whatever order your feeling is the right way to go! Finally, put the whole thing in a pan, and bake for about 30-40 minutes or until the apples are soft when pierced with a fork.

Baked Apple Fries

This is one of the most simple recipes to try at home. In fact, I’m sure everyone has done a version of this at some point in their life. It’s quick, easy, and you can even get some counting exercises in as you spoon on the cinnamon and sugar. The recipe makes about 10 quarter cup servings.

Ingredients:                                                                    What you’ll need:

6-8 medium apples                                                             Large mixing bowl

1 lemon                                                                                 Wooden spoon

Bowl of cinnamon                                                                Cutting board/knife

Bowl of sugar                                                                         Baking sheets

Oven: 400 degrees

Start by thinly slicing all apples (leave skin on)- the thinner you slice them, the faster they’ll bake! After placing all the apples in the bowl, squeeze the juice of the lemon over them and mix well. Generously coat the apples with cinnamon, then add about a fourth as much sugar. You don’t need much sugar, and in fact you could omit any added sugar from the recipe- apples are sweet enough as they are, and get much sweeter as you bake!

[At this point, I had the kids put 4 spoon fulls of cinnamon and 1 spoon of sugar. This provided a way to practice counting and gain a better understanding of the two ingredients]

Mix all ingredients well. Once completely coated, spread the mix evenly on your baking sheets and bake for about 30 minutes. Be sure to turn the apples a few times during the baking.

The apple saga

This past month has been Apple-Mania at work. Not only had I already started out the school year/Fall season with one of autumn’s most loved fruits, the apple, but then a preschool wide apple picking field trip happened. Needless to say, when I saw an entire refrigerator worth of apples [no exaggeration], I thought to myself, “challenge accepted”.

My class has spent the past month creating, cooking, and exploring the many uses of apples, and I love it. The apple doesn’t just provide versatility, with its hardy flesh that can withstand various degrees of cooking and manipulation, but there are so many varieties of apples, you’re sure to find one that your child will like.

Quite frankly, one of the reasons I love apples so much is not simply because kids love them, but because kids love them and they’re FILLED with nutritional benefits. Let’s be honest, it’s hard to get kids to eat a whole nutritional spectrum of vitamins, minerals, [good] fats, and the like. But with the apple they at least get polyphenols, flavonoids, and vitamin C, as well as a healthy dose of fiber, and potassium.

[Some context: Flavonoids are polyphenolic compounds most commonly found in fruits, veggies, and certain drinks. Why do we love them? Well, over the past decade they’ve been found to have antiviral, anti-allergic, anti-inflammatory, antitumor, and antioxidant affects.]

All of this aside, you have to remember that most of the great things about the apple goes out the window once you don’t buy organic. Unfortunately we live in a society that feels the need to mass-produce the “perfect” example of our fruit and veggie crop. This not only messes with the natural order of the food system by increasing the chances of survival of particular foods, but it also leads us to ingesting a healthy dose of chemical fertilizers, pesticides, and fungicides. These things being said, organic is pricey. If you find yourself in a situation where you absolutely can’t buy organic, first try rationalizing it by remember that you’ll help offset your medical bills later on. But if that doesn’t help, try to at least find food from a farm that uses low spray chemicals… then scrub those apples like a burned frying pan.

[More context: There are a lot of man made chemicals used in spraying our crops. This includes, but is not limited to, ethanol, sulfuric acid, fuel oil, and even Agent Orange. Perhaps you remember that particular chemical [Agent Orange] from the Vietnam War? Perhaps, then, you also remember the intense spike in health problems amongst war veterans and their family members]

Check out my Fall/Winter recipe section for the cooking activities my preschoolers and I did this past month. It feels good to get out of the crazy apple fiasco and I’m looking forward to exploring more fall harvest foods like pumpkin, squash, and figs!

Welcome to the New Millenium

This would be my first blog post. Ever. It’s hard to believe I managed to get through the 90’s and 2000’s without ever having a blog, livejournal, tumblr, or even a twitter account. So this, my friends, would be my introduction to the New Millennium. In all honesty it wasn’t that I never thought about starting a blog of some sorts, it was more that I didn’t see anything to write about that wasn’t already being blogged. Through crossed interests in food justice/cafeteria reform and various forms of childcare work (beginning as a nanny and now going into my second year working within preschools in the tri-state area), something has become painfully clear to me—no one knows how to feed a child.

When I say this I am not placing blame on parents or caregivers of any kind, and I am not saying we don’t know the basics when it comes to what food is healthy and what food isn’t. What I mean is that through the intertwining cause and effects of everyday life, we have all forgotten how to introduce children to foods. We’ve somehow lost the ability to introduce foods to their full extent. Not only that, but the rituals that circle around food, which includes every aspect of growing and harvesting, as well as our seasonal preparation of food (and how and why we prepare food in correlation to the seasonal shifts) has been misplaced. We no longer dry/dehydrate, can, pickle, and preserve. We don’t salt our meats, or smoke them to extend their shelf life. What we do instead is go to the super market, where we have dozens upon dozens of out of season fruits and vegetables at our fingertips, and pick the ones that look the closest to “perfect”. The fact that we have the ability to go to the supermarket and buy apples in the middle of spring, or lettuce in the middle of winter is great, but it poses its own problems—it confuses the current generation of children in terms of seasonal change and what that means for our food system. The supermarket to kitchen culture we so actively participate in not only counteracts the evolutionary state of our bodies, which [digestively speaking] have been virtually unchanged for thousands of generations, but it deprives us of vital nutrients we once gained directly from absorbing minerals through our hands from the dirt.

After piecing together my readings over the past few years, my one-on-one work with children of various ages, abilities, and interests, and my work within pre-schools, it’s clear to see that children [still] inherently gravitate towards food. They want to learn about where their food comes from and actively participate in cultivating it; they want to learn how to make those granola bars Mom and Dad buy at the grocery store. I believe that’s because our bodies are, on a deeper level, aware of the difference between the foods we create from scratch, and the highly processed foods we find easily accessible throughout our country. As my time in the city continues, I’m finding this is particular to children in more urbanized areas where space is scarce, and fresh food can be just as difficult to find.

These are simply a few thoughts that started me on my journey this year. I am in no way trying to tell people how to feed their children, or even that I know the best way to spark your child’s interest in food. I’m simply throwing out the information I have because when it comes down to the “nitty gritty,” there are a lot of factors that go into how and what we eat (money, access, food allergies, etc). Like anything in the learning and growing process, some will respond positively, while others negatively.  What I’m hoping to do is create a reference of activities one could do with children. A list of activities that will help us all continue to introduce foods in all their elements; Not only taste, but smell, texture/touch, color, sight, and sound. Food involves all of these sensory pieces that are so vital to expanding our understanding of the world around us, which is what makes it one of the ultimate learning tools.